spring boot 에서 내장 database(h2)를 사용할때 application.properties 에 

spring.datasource.url=jdbc:h2:mem:test
spring.datasource.driverClassName=org.h2.Driver
spring.datasource.username=sa
spring.datasource.password=

와 같이 작성을 해주면 어플리케이션이 시작 할때 자동으로 관련 database를 생성 해주게 됩니다.

(특정 버전 이전에는 위의 설정이 없어도 자동으로 생성 해주었는데 현재는 설정이 있어야 생성 된다고 합니다.)

https://howtodoinjava.com/spring-boot2/h2-database-example/


Spring Boot with H2 Database (In-Memory Database)

Learn to configure Spring boot with H2 database to create and use an in-memory database in runtime for unit testing or POC purposes.

howtodoinjava.com

위와 같이 사용하는 경우 크게 신경쓰지 않고 작업이 가능 합니다. 문제가 생기는건 해당 DB에 접근 하기 위한 datasource를 다중으로 구성하는 경우 입니다.

이 경우 

https://www.baeldung.com/spring-data-jpa-multiple-databases

내용을 참고 해서 서비스를 시작 하면 

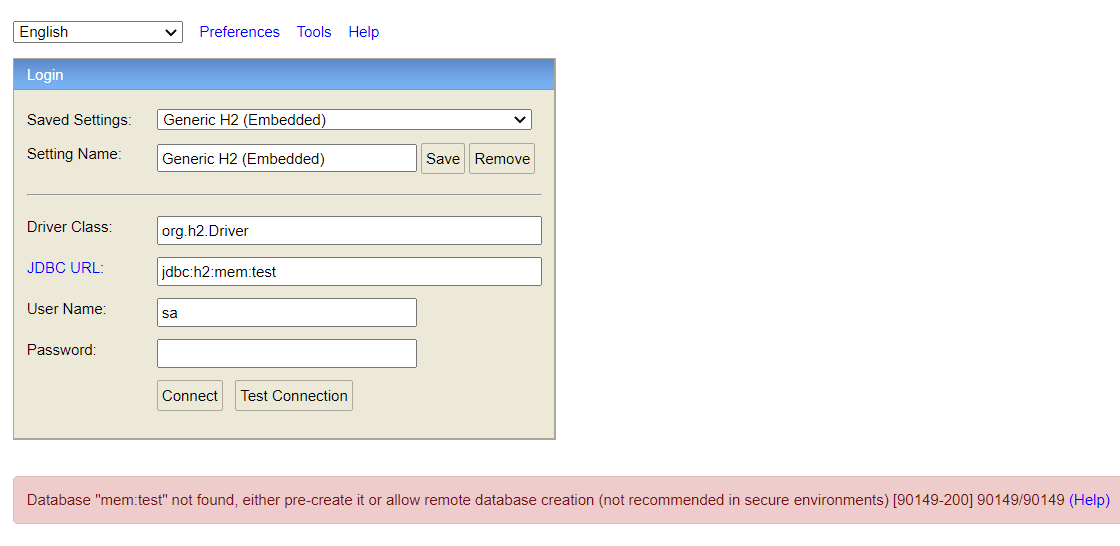
위의 사진가 같이 mem:test database를 찾지 못해서 접속이 되지 않는 문제가 발생됩니다.

관련 내용을 찾아 보다 아래와 같은 글을 발견 했습니다.

https://stackoverflow.com/questions/55349373/database-not-found-and-ifexists-true-so-we-cant-auto-create-it


Database not found, and IFEXISTS=true, so we cant auto-create it

I am getting error after opening the h2 database console. I enter database name but it is showing database not found error: Database "C:/Users/Barlekar/onlineshoppings" not found, and IFEXISTS...

stackoverflow.com

위의 다중 datasource와는 상관 없는데 url을 jdbc:h2:~/test 으로 변경 하는 경우

정상적으로 database에 접속 할 수 있게 됩니다.

위의 url로 설정하는 경우 DB파일이 C:\Users\user-name\test.mv.db 경로로 생성 됩니다.

위와 같이 물리적 파일을 생성하는 url의 경우 다중 설정이 정상적으로 생성 되게 됩니다.

위와 같이 url을 물리적 파일 기준으로 작성 하는경우

spring.datasource.url=jdbc:h2:~/test
spring.datasource.driverClassName=org.h2.Driver
spring.datasource.username=sa
spring.datasource.password=

spring.datasource2.url=jdbc:h2:~/test2
spring.datasource2.driverClassName=org.h2.Driver
spring.datasource2.username=sa
spring.datasource2.password=

spring.jpa.database-platform=org.hibernate.dialect.H2Dialect
spring.jpa.properties.hibernate.dialect=org.hibernate.dialect.H2Dialect
#파일형의 경우 초기 생성 후 database가 유지 되기 때문에 아래 설정은 한번만 실행 시켜야 합니다.
spring.sql.init.mode=always

2개의 database를 사용해도 2개 모두 정상적으로 초기 생성 되게 됩니다.


(문제 현상에 대한 완벽한 이해 없이 우선 발생한 상황에 대해서만 기술한 내용 입니다. 문제에 대한 이해가

완료 되면 해당 문서를 갱신 할 예정 입니다.)

반응형
Posted by 질주하는구
,

@ControllerAdvice+@ResponseBody 를 한꺼번에 사용 할 수 있게 해주는 어노테이션 입니다.


@ControllerAdvice은 @InitBinder, @ModelAttribute, @ExceptionHandler 관련 어노테이션을 여러 컨트롤러에 걸쳐 공통으로 설정 할 수 있게 해주는 어노테이션 인데 ExceptionHandler를 위해서 많이 사용 하고 있습니다.


@ControllerAdvice(assignableTypes={TestController.class, Test2Controller.class})

와 같이 사용해서 영향을 미치는 컨트롤러를 정의 할 수 있고 범위는 class, 패키지, 특정 어노테이션 등으로 정의 할 수 있습니다.

assignableTypes의 조건을 많이 사용하는 경우 성능에 악영향을 미칠 수 있습니다.

https://docs.spring.io/spring-framework/docs/5.3.18/javadoc-api/org/springframework/web/bind/annotation/ControllerAdvice.html


ControllerAdvice (Spring Framework 5.3.18 API)

Specialization of @Component for classes that declare @ExceptionHandler, @InitBinder, or @ModelAttribute methods to be shared across multiple @Controller classes. Classes annotated with @ControllerAdvice can be declared explicitly as Spring beans or auto-d

docs.spring.io

ExceptionHandler 와 같이 사용하는 경우 아래와 같이 사용 할 수 있습니다.

@RestControllerAdvice
public class ControllerExceptionHandler {
	private Logger logger = LoggerFactory.getLogger(this.getClass());
	
	@ResponseStatus(value = HttpStatus.OK)
	@ExceptionHandler(value = NullPointerException.class)
    public HashMap<String, Object> nullPointerException(Exception e, Model model) {
		
		logger.error(e.getLocalizedMessage());
		
		HashMap<String, Object> returnMap = new HashMap<String, Object>();
		returnMap.put("result", false);
		returnMap.put("message", "비정상적인 정보(null) 입니다.");
		
        return returnMap;
    }
    
    @ResponseStatus(value = HttpStatus.OK)
	@ExceptionHandler(value = ClassCastException.class)
    public HashMap<String, Object> classCastException(Exception e, Model model) {
		
		logger.error(e.getLocalizedMessage());
		
		HashMap<String, Object> returnMap = new HashMap<String, Object>();
		returnMap.put("result", false);
		returnMap.put("message", "프로그램이 비정상 구동 되었습니다. 시스템 확인이 필요 합니다.(classCastException)");
		
        return returnMap;
    }
    
    @ResponseStatus(value = HttpStatus.OK)
   	@ExceptionHandler(value = NoClassDefFoundError.class)
       public HashMap<String, Object> noClassDefFoundError(Exception e, Model model) {
   		
   		logger.error(e.getLocalizedMessage());
   		
   		HashMap<String, Object> returnMap = new HashMap<String, Object>();
   		returnMap.put("result", false);
   		returnMap.put("message", "프로그램이 비정상 구동 되었습니다. 시스템 확인이 필요 합니다.(noClassDefFoundError)");
   		
           return returnMap;
       }
	
	@ResponseStatus(value = HttpStatus.OK)
	@ExceptionHandler(value = ArrayIndexOutOfBoundsException.class)
    public HashMap<String, Object> arrayIndexOutOfBoundsException(Exception e, Model model) {
		
		logger.error(e.getLocalizedMessage());
		
		HashMap<String, Object> returnMap = new HashMap<String, Object>();
		returnMap.put("result", false);
		returnMap.put("message", "비정상적인 배열 정보 입니다.(ArrayIndexOutOfBoundsException)");
		
        return returnMap;
    }
	
	@ResponseStatus(value = HttpStatus.OK)
	@ExceptionHandler(value = IndexOutOfBoundsException.class)
    public HashMap<String, Object> indexOutOfBoundsException(Exception e, Model model) {
		
		logger.error(e.getLocalizedMessage());
		
		HashMap<String, Object> returnMap = new HashMap<String, Object>();
		returnMap.put("result", false);
		returnMap.put("message", "비정상적인 배열 정보를 확인 하고 있습니다.(IndexOutOfBoundsException)");
		
        return returnMap;
    }
	
	@ResponseStatus(value = HttpStatus.OK)
	@ExceptionHandler(value = ClassNotFoundException.class)
    public HashMap<String, Object> classNotFoundException(Exception e, Model model) {
		
		logger.error(e.getLocalizedMessage());
		
		HashMap<String, Object> returnMap = new HashMap<String, Object>();
		returnMap.put("result", false);
		returnMap.put("message", "프로그램이 비정상 구동 되었습니다. 시스템 확인이 필요 합니다.(ClassNotFoundException)");
		
        return returnMap;
    }
	
	@ResponseStatus(value = HttpStatus.OK)
	@ExceptionHandler(value = PersistenceException.class)
    public HashMap<String, Object> persistenceException(Exception e, Model model) {
		
		logger.error(e.getLocalizedMessage());
		
		HashMap<String, Object> returnMap = new HashMap<String, Object>();
		returnMap.put("result", false);
		returnMap.put("message", "데이터 작업 중 문제가 발생 되었습니다.");
		
        return returnMap;
    }
	
}

service 및 repository 에서는 모든 예외를 throws 하고 ControllerAdvice를 이용해서 조건에 맞는 에러에 대한

응답을 json으로 사용자 화면에 출력 합니다.

이때 @ResponseStatus(value = HttpStatus.OK) 코드로 정상 응답이 된걸로 변경 해줍니다.


https://docs.spring.io/spring-framework/docs/current/reference/html/web.html#mvc-ann-controller-advice


Web on Servlet Stack

This part of the reference documentation covers support for Servlet stack, WebSocket messaging that includes raw WebSocket interactions, WebSocket emulation through SockJS, and publish-subscribe messaging through STOMP as a sub-protocol over WebSocket. 4.1

docs.spring.io


반응형
Posted by 질주하는구
,

spring boot 에 view template으로 freemarker을 적용하는 간단한 방법을 정리 합니다.


spring boot 에서는 view templat으로 (FreeMarker, Groovy, Thymeleaf, Mustache) 을 지원하고 있습니다.

이중 spring에서는 Thymeleaf를 적극적으로 지원 하고 있고 해당 탬플릿의 경우 커스텀 유연성이 높아 많은 사용자가

사용하고 있습니다.

Groovy나 Mustache의 경우 사용 속도, 사용방법, 커뮤니티 활성화 등 다른 2개의 템플릿보다 떨어지는 부분이

많아 spring boot에서 view template을 사용한다면 freemarker 이나 Thymeleaf를 사용하는게 좋습니다.


2개의 템플릿중 freemarker 를 적용하는 방법을 간단하게 기술 합니다.

(토이프로젝트로 폼빌더 관련 작업시 view template으로 freemarker을 사용할 예정 이여서 관련 내용을 적용하면서 정리

하는 겁니다. 해당 템플릿을 선택한 이유는 커스텀을 거의 사용하지 않을것이고 충분한 속도, jstl과 크게 차이나지 않는 사용 방법 및 사용관련 내용이 잘 정리 되어 있어 freemarker을 선택 했습니다.)


먼저 build.gradle에 의존성을 추가 해줍니다.

implementation 'org.springframework.boot:spring-boot-starter-freemarker'

그뒤 freemarker에서 사용할 설정 내용을 application.properties에 추가 해줍니다.

#freemarker 템플릿 경로 지정
spring.freemarker.template-loader-path=classpath:/templates 
#return 호출시 앞쪽에 자동으로 붙는 내용 정의
spring.freemarker.prefix=/freemarker
#return 호출시 뒷쪽에 자동으로 붙는 내용 정의
spring.freemarker.suffix=.ftl
#freemarker content type 정의
spring.freemarker.contentType=text/html
#freemarker charset 정의
spring.freemarker.charset=UTF-8
#기본은 true (false로 설정 하는 경우 프리마커 변경 내용이 바로 적용 됨) 
spring.freemarker.cache=false

위의 내용을 추가 해주면 모든 준비가 되었습니다. 서비스 시작시 호출할 ftl파일을

설저한 /src/main/resources/templates/freemarker 폴더 하위로 생성 해주고 호출 해주면 됩니다.


저는 bootstrap을 사용할 예정이여서 layout.ftl 파일을 만들고 해당 파일을 호출 하면서 실제 동작하는 내용에 해당하는

list.ftl을 <#include incPath> 으로 호출 하려고 합니다.


modelAndView.addObject("incPath", "../formSet/list.ftl");
modelAndView.setViewName("/layout/layout_view_1");

으로 경로를 정의 해주고 해당 파일을 

/src/main/resources/templates/freemarker/layout/layout.ftl
/src/main/resources/templates/freemarker/formSet/list.ftl

에 만들어 주면 작업한 화면을 볼 수 있습니다.


incPath의 경로를 ../formSet/list.ftl 으로 지정 해줘야(파일의 실제 경로) include 할 수 있습니다.

반응형
Posted by 질주하는구
,

spring-boot 사용 중 DB접속 정보(계정, 비밀번호)를 application.properties에 등록 하는 경우 

해당 정보를 암호화 해야 하는 경우가 있습니다.(개인적으로 진행하는 프로젝트가 아니라면 무조건 암호화를 해줘야 합니다.)


jasypt를 이용해서 관련 작업을 진행 할 수 있는데 build.gradle 에 관련 의존성을 추가 해줍니다.


implementation 'com.github.ulisesbocchio:jasypt-spring-boot-starter:3.0.4'
implementation 'org.bouncycastle:bcprov-jdk15on:1.61'

암호화 관련 설정시 사용할 정보를 application.properties에 아래와 같이 추가 해주고

jasypt.encryptor.password=mypassword
jasypt.encryptor.algorithm=PBEWithMD5AndDES
jasypt.encryptor.property.prefix=ENC[
jasypt.encryptor.property.suffix=]

사용 하고자 하는 정보를 아래의 소스를 참고해 암호화 해줍니다.

StandardPBEStringEncryptor encryptor = new StandardPBEStringEncryptor(); 
SimpleStringPBEConfig config = new SimpleStringPBEConfig(); 
config.setPassword("mypassword"); 
config.setAlgorithm("PBEWithMD5AndDES"); 
config.setKeyObtentionIterations("1000"); 
config.setPoolSize("1"); 
config.setSaltGeneratorClassName("org.jasypt.salt.RandomSaltGenerator"); 
config.setStringOutputType("base64"); 
encryptor.setConfig(config); 

String plainText = "test"; // 암호화 할 내용
String encryptedText = encryptor.encrypt(plainText); // 암호화
String decryptedText = encryptor.decrypt(encryptedText); // 복호화
System.out.println("Enc:"+encryptedText+", Dec:"+decryptedText);

해당 결과를 database관련 설정의 value로 등록 해주고

spring.datasource.username=ENC[ZKu/LKf9DyGnJPAXqWW7uQ==]
spring.datasource.password=ENC[kXjtcrMkTLitu2n0Y+1vdA==]

위의 설정처럼 ENC[] 으로 값을 감싸 줍니다.(해당 정보를 기준으로 암호화 여부를 결정 하게 됩니다. 기본 설정은 ENC()입니다.)

서비스 시작시 해당 정보를 복호화 할 class를 아래와 같이 추가 해주면

@Configuration
@EnableEncryptableProperties
public class PropertyEncryptConfig {
	
	private Logger logger = LoggerFactory.getLogger(this.getClass());

	public static final String JASYPT_STRING_ENCRYPTOR = "jasyptStringEncryptor";
		
	@Value("${jasypt.encryptor.password}") 
	private String encryptKey;

	@Value("${jasypt.encryptor.algorithm}") 
	private String algorithm;
	
	@Bean(JASYPT_STRING_ENCRYPTOR) 
	public StringEncryptor stringEncryptor() { 
		logger.info("encryptKey: "+encryptKey);
		logger.info("algorithm: "+algorithm);
		
		StandardPBEStringEncryptor encryptor = new StandardPBEStringEncryptor(); 
		SimpleStringPBEConfig config = new SimpleStringPBEConfig(); 
		config.setPassword(encryptKey); 
		config.setAlgorithm(algorithm); 
		config.setKeyObtentionIterations("1000"); 
		config.setPoolSize("1"); 
		config.setSaltGeneratorClassName("org.jasypt.salt.RandomSaltGenerator"); 
		config.setStringOutputType("base64"); 
		encryptor.setConfig(config); 
		
		logger.info("end");
		
		return encryptor;
	}
}

설정한 정보가 복호화 되서 접속 하게 됩니다.

아래는 작업시 참고한 블로그 입니다. 

https://derveljunit.tistory.com/339


[Spring & Boot][2.6.2] 스프링 프로퍼티 암복호화 Jasypt 예제

스프링부트 2.6.2 버전을 기준으로 작성되었습니다. 예제 Github 주소 https://github.com/Derveljun/derveljun-jasypt-example GitHub - Derveljun/derveljun-jasypt-example Contribute to Derveljun/derveljun-..

derveljunit.tistory.com

https://www.baeldung.com/spring-boot-jasypt


반응형

'spring' 카테고리의 다른 글

@RestControllerAdvice 관련 정리  (0) 2022.04.12
spring boot freemarker 적용  (0) 2022.03.28
이클립스 gradle 빌드  (0) 2022.03.15
spring-boot jdbc database 초기화 schema.sql, data.sql  (0) 2022.03.09
spring boot 실행시 DB 연결에러  (0) 2021.11.25
Posted by 질주하는구
,

이클립스 gradle 빌드

spring 2022. 3. 15. 11:34

이클립스에서 gradle 빌드 하는 내용 입니다.


빌드를 원하는 프로젝트를 선택 후 

Run As > Run Configurations

출력된 팝업 중 Gradle Task를 우클릭하고 configuration을 추가 해줍니다.

Gradle Task > New Configuration


작업할 내용을 선택/입력 해주고

Working Directory 선택 > Gradle Tasks Add-bootjar 입력 > Apply > Run

Run시 해당 프로젝트 폴더 하위 /build/libs 경로에 작업한 .jar 파일이 생성 되게 됩니다.

해당 파일은 

java -jar run_jar_name.jar 로 실행 및 확인 할 수 있습니다.

반응형
Posted by 질주하는구
,

spring jdbc를 이용해서 database를 초기화 하는 간단한 방법을 정리 했습니다.

spring boot 버전에 따라 다르기 때문에 버전에 맞춰서 작업 해주면 됩니다.


2.4 이하 버전의 경우 src/resource/ 하위에 schema.sql, data.sql 파일이 있는경우 해당 파일이 start시 자동으로

동작 하게 되어 있습니다.

해당 설정이 정상 동작 하지 않는 경우 application.properties 에 spring.datasource.initialization-mode=always

설정을 추가 해주시면 됩니다.(저 설정 기본이 always입니다.)


2.5 이상의 경우 .sql파일이 자동으로 실행 되지 않습니다. application.properties 파일에

spring.sql.init.mode=always 설정을 추가 해줘야 정상 동작 하게 됩니다.


추가로 2.4 이하버전에 schema.sql파일 없이 data.sql파일만 생성 후 spring.jpa.hibernate.ddl-auto 설정으로

테이블 구성을 하였던 경우 에러가 발생되게 됩니다. 2.5 버전 부터는 jpa가 먼저 실행 되고 hibernate관련

설정이 동작 하기 때문에 테이블 생성 안된 상태로 data를 초기화 하는 문제가 있습니다.

이 경우 spring.jpa.defer-datasource-initialization=true 설정을 추가 해주면 동작이 가능 합니다.

아래의 링크에 자세한 내용이 나와 있지만 jpa와 hibernate를 혼용 하는건 권장 하지 않는다고 하니 참고 하시면

될거 같습니다.

https://www.baeldung.com/spring-boot-data-sql-and-schema-sql


반응형
Posted by 질주하는구
,

이클립스 IDE에서 queryDsl 관련 설정을 추가 하는 간단한 gradle설정 파일 입니다.

build.gradle
0.00MB

해당 파일의 querydsl 관련 설정 부분을 추가 후 

refresh gradle project -> gradle tasks 탭에서 builde>builde>Run Gradle Tasks 를 해주면

설정한 경로에 Q클래스가 생성 됩니다.


반응형
Posted by 질주하는구
,

nativeQuery를 true로 설정 후 결과 값을 Map이 아닌 dto 형식으로 넘기고자 하는 경우 interface를 활용 할 수 있습니다.


아래와 같은 쿼리문 실행 후 결과를 담을 

@Query(value = "SELECT MAX(BBS_ITEM_LIST_ORDER) as listOrder, MAX(BBS_ITEM_MINI_ORDER) as miniListOrder, MAX(BBS_ITEM_VIEW_ORDER) as viewOrder  FROM T_BBS_ITEM WHERE BBS_SET_SEQ = :bbsSetSeq" , nativeQuery = true)
public BbsItemInf getMaxOrderSub(@Param("bbsSetSeq") Integer bbsSetSeq);


interface를 생성 합니다.

public interface BbsItemInf {
	Integer getListOrder();
	Integer getminiListOrder();
	Integer getviewOrder();
}

생성한 interface는 아래와 같이 받아서 메소드를 호출 해 바로 사용 가능 합니다.

BbsItemInf bbsItemInf = bbsItemRepository.getMaxOrderSub(2);
System.out.println("bbsItemInf: "+bbsItemInf.getListOrder());

데이터 설정은 as 이름으로 설정 됩니다.(아래 stackorverflow내용보면 match by order not by name 이런 내용이 있는데

이건 답변 하신분이 쿼리문 작성시에 as를 하지 않고 컬럼명만 작성해서 순차적으로 데이터 셋팅이 되는 경우로 보입니다.)

https://stackoverflow.com/questions/64762080/how-to-map-sql-native-query-result-into-dto-in-spring-jpa-repository


How to map sql native query result into DTO in spring jpa repository?

Hi what I am trying to achieve is to get SQL native query result map into my DTO in java spring jpa repository, how do I do this properly? I try several code, but it does not work, here is what I t...

stackoverflow.com

stackorverflow의 질문 답변에 보면 이런식의 사용의 경우 내부적으로 DTO로 바로 넘기는 방식에 비해서 자원 

낭비가 많다는 이야기가 있어 확실 한 테스트가 필요 합니다.

특별한 경우가 아니라면 가능하면 map을 이용 하는게 좋을거 같습니다.

반응형
Posted by 질주하는구
,

spring boot에서 spring-boot-starter-batch 를 사용하는 경우 자동으로 JDBC관련 설정이 동작하게 됩니다.

관련 설정을 하지 않은 경우 

아래와 같은 에러가 발생 됩니다.


Failed to configure a DataSource: 'url' attribute is not specified and no embedded datasource could be configured.


간단하게 application.properties 에 DB관련 설정을 추가 해주면 되지만

(

spring.datasource.url=
spring.datasource.username=
spring.datasource.password=
spring.datasource.driver-class-name=

)

batch에서 굳이 jdbc연결이 필요 없는 경우 관련 설정을 제외처리 할 수 있습니다.


-제외처리

@SpringBootApplication(exclude = { DataSourceAutoConfiguration.class })

exclude 를 이용해서 datasource관련 설정이 동작하지 않게 제외 설정 합니다.


반응형
Posted by 질주하는구
,

spring boot lucy filter 추가 + filter 추가 spring boot 기반으로 작업 시 lucy filter를 추가 하는 경우 아래와 같이 작업 할 수 있습니다. xml기반의 경우 web.xml에

<filter>
   <filter-name>xssEscapeServletFilter</filter-name>
   <filter-class>com.navercorp.lucy.security.xss.servletfilter.XssEscapeServletFilter</filter-class>
</filter>
<filter-mapping>
   <filter-name>xssEscapeServletFilter</filter-name>
   <url-pattern>*.do</url-pattern>
</filter-mapping>

와 같이 추가 해주면 되는데 spring boot의 경우 filterRegistrationBean 메소드를 이용해서 추가 할 수 있습니다.

@Bean
public FilterRegistrationBean filterRegistrationBean() {
	FilterRegistrationBean filterRegistration = new FilterRegistrationBean<>();
	filterRegistration.setFilter(new XssEscapeServletFilter());
	filterRegistration.setOrder(1);
	filterRegistration.addUrlPatterns("/*");
	//filterRegistration.setUrlPatterns(Arrays.asList("/*"));
	return filterRegistration;
}

해당 메소드의 위치는 @SpringBootApplication 클래스 하위에 위치해도 되고

@Configuration
public class XssConfig implements WebMvcConfigurer {
	@Bean
	public FilterRegistrationBean filterRegistrationBean() {
		FilterRegistrationBean filterRegistration = new FilterRegistrationBean<>();
		filterRegistration.setFilter(new XssEscapeServletFilter());
		filterRegistration.setOrder(1);
		filterRegistration.addUrlPatterns("/*");
		//filterRegistration.setUrlPatterns(Arrays.asList("/board/*"));
		return filterRegistration;
	}
}

와 같이 추가 @Configuration 를 정의해서 추가 할 수 있습니다.

-- 설정 메소드 간단 설명

setOrder = 여러개의 필터가 사용되는 경우 필터 적용 순서를 정의 합니다.

addUrlPatterns = 필터가 적용될 url패턴을 하나식 추가 합니다.

setUrlPatterns = 필터가 적용될 url패턴을 여러건 한꺼번에 추가 합니다.

또한 자신이 만든 filter를 추가 하려는 경우 아래의 2가지 방법으로 추가 할 수 있습니다.

1) extends GenericFilterBean 후

@Override public void doFilter(ServletRequest request, ServletResponse response, FilterChain filterChain) throws IOException, ServletException {

를 오버라이드 해서 구현 할 수 있습니다.

(

해당 필터 클래스 상단에 @WebFilter(urlPatterns = "/*") 를 추가 해주고 @ServletComponentScan을 이용해서 filterRegistrationBean에서 선언하지 않고 필터 설정까지 한번에 추가 가능 합니다. @WebFilter 를 사용하는 경우 실행순서를 지정 하려면

@WebFilter(filterName="filter1")
public class Filter1 implements Filter {}
@WebFilter(filterName="filter2")
public class Filter2 implements Filter {}

<filter-mapping>
    <filter-name>filter1</filter-name>
    <url-pattern>/url1/*</url-pattern>
</filter-mapping>
<filter-mapping>
    <filter-name>filter2</filter-name>
    <url-pattern>/url2/*</url-pattern>
</filter-mapping>

와 같이 web.xml 을 이용해줘야 합니다.

)

2) implements Filter 후

@Override
public void doFilter(ServletRequest request, ServletResponse response, FilterChain chain) throws IOException, ServletException {

를 오버라이드 해서 구현 할 수 있습니다.

반응형
Posted by 질주하는구
,